Building a Meshtastic Node in Adelaide: My Experince With LoRa Mesh Networking
Building a solar-powered Meshtastic LoRa mesh node using RAK Wireless WisBlock hardware and automating via Python using BLE connectivity

After falling down the YouTube rabbit hole watching videos about Meshtastic, an open-source off-grid mesh networking protocol that uses LoRa radios for long-range communication, I couldn’t resist. The Adelaide mesh network had just under 150 devices listed on the map at the time.
I ordered a RAK Wireless WisBlock Starter Kit, which showed up with a RAK19007 base board, a RAK4631 core module, plus LoRa and Bluetooth antennas. I also grabbed a SHTC3 temperature/humidity sensor and a LPS22HB barometric pressure sensor because why not. At the time, I had absolutely no practical use for any of this. It just seemed cool.
 The RAK Wireless WisBlock Starter Kit fresh out of the box
Getting Started with RAK Wireless WisBlock Hardware
I threw the starter kit together and mounted it inside its anti-static bag, moving it around different spots in my place. The stock antennas are pretty weak, but they worked well enough for initial testing. I could discover some nearby nodes and send trace routes intermittently. That was enough to get me hooked and trigger another late night shopping session.
 Early testing with the node velcroed to my NBN box outside
The second order included two antennas (a 3Dbi ZIISOR and a 10dB Gizont), a project box, two Samsung 18650 batteries, some battery holders and a solar panel to try keeping everything self-sufficient. When the package arrived, I realised late night shopping has consequences. The battery holders I’d ordered were wired in series instead of parallel and what I thought were the internal dimensions of the box turned out to be external measurements. Nothing was going to fit.
 All the parts from my second purchase, before reality set in
Dremel to the rescue. I cut down the four battery holders into configurations of three and two to make them fit inside the case. Not pretty, but functional.
 The battery holder after some aggressive Dremel work, fitted with the small antenna
Building a Solar-Powered Meshtastic Node with 18650 Batteries
Wiring everything up showed the batteries at 55% charge and everything running smoothly. The next day I tested the solar panel’s built-in USB-C cable for charging and watched it slowly tick up by 0.1V increments over time. Working as intended.
Then came antenna testing. The small antenna worked great with decent coverage, but the larger fibreglass antenna absolutely blew me away. I was picking up nodes that should’ve been completely out of line of sight. Problem was, I didn’t have a drill bit large enough for the bigger antenna, so I had to stick with the smaller one until I could borrow the right tools.


Left: Large antenna mounted on a cardboard box for testing. Right: Solar charging test on the lawn with a peg basket as an antenna mount
 The setup during long-term testing with the small antenna while I waited for the right drill bit
Eventually I got the proper drill bit and borrowed some sealant from my brother to mount the solar panel properly. No more sketchy electrical tape mounting.
 The whole setup with large antenna, node, batteries and solar panel
When I applied the Permatex sealant, I had it all squared up and everything looked good. I was pretty happy with how straight it looked. Then I went to check on it the next day and found it had shifted completely out of whack while curing. Not ideal, but at least it’s waterproof.
 The sealant job for mounting the solar panel. Not my finest work
This was a test deployment at work. Not ideal since it was mounted on the post of the carport, but even still I could get direct connections to three different nodes. More impressively, I was able to send messages to just about every node in the Adelaide mesh through routing. The solar charging was working well too, with the power level floating fairly stable throughout the day.
 Test mounting with velcro tabs on the carport
I also decided to cut the solar panel wire and solder it directly to the RAK board’s solar connector. A lot of build videos I’d watched used external solar charge controllers, which confused me since I thought the RAK4631 has a built-in solar input.
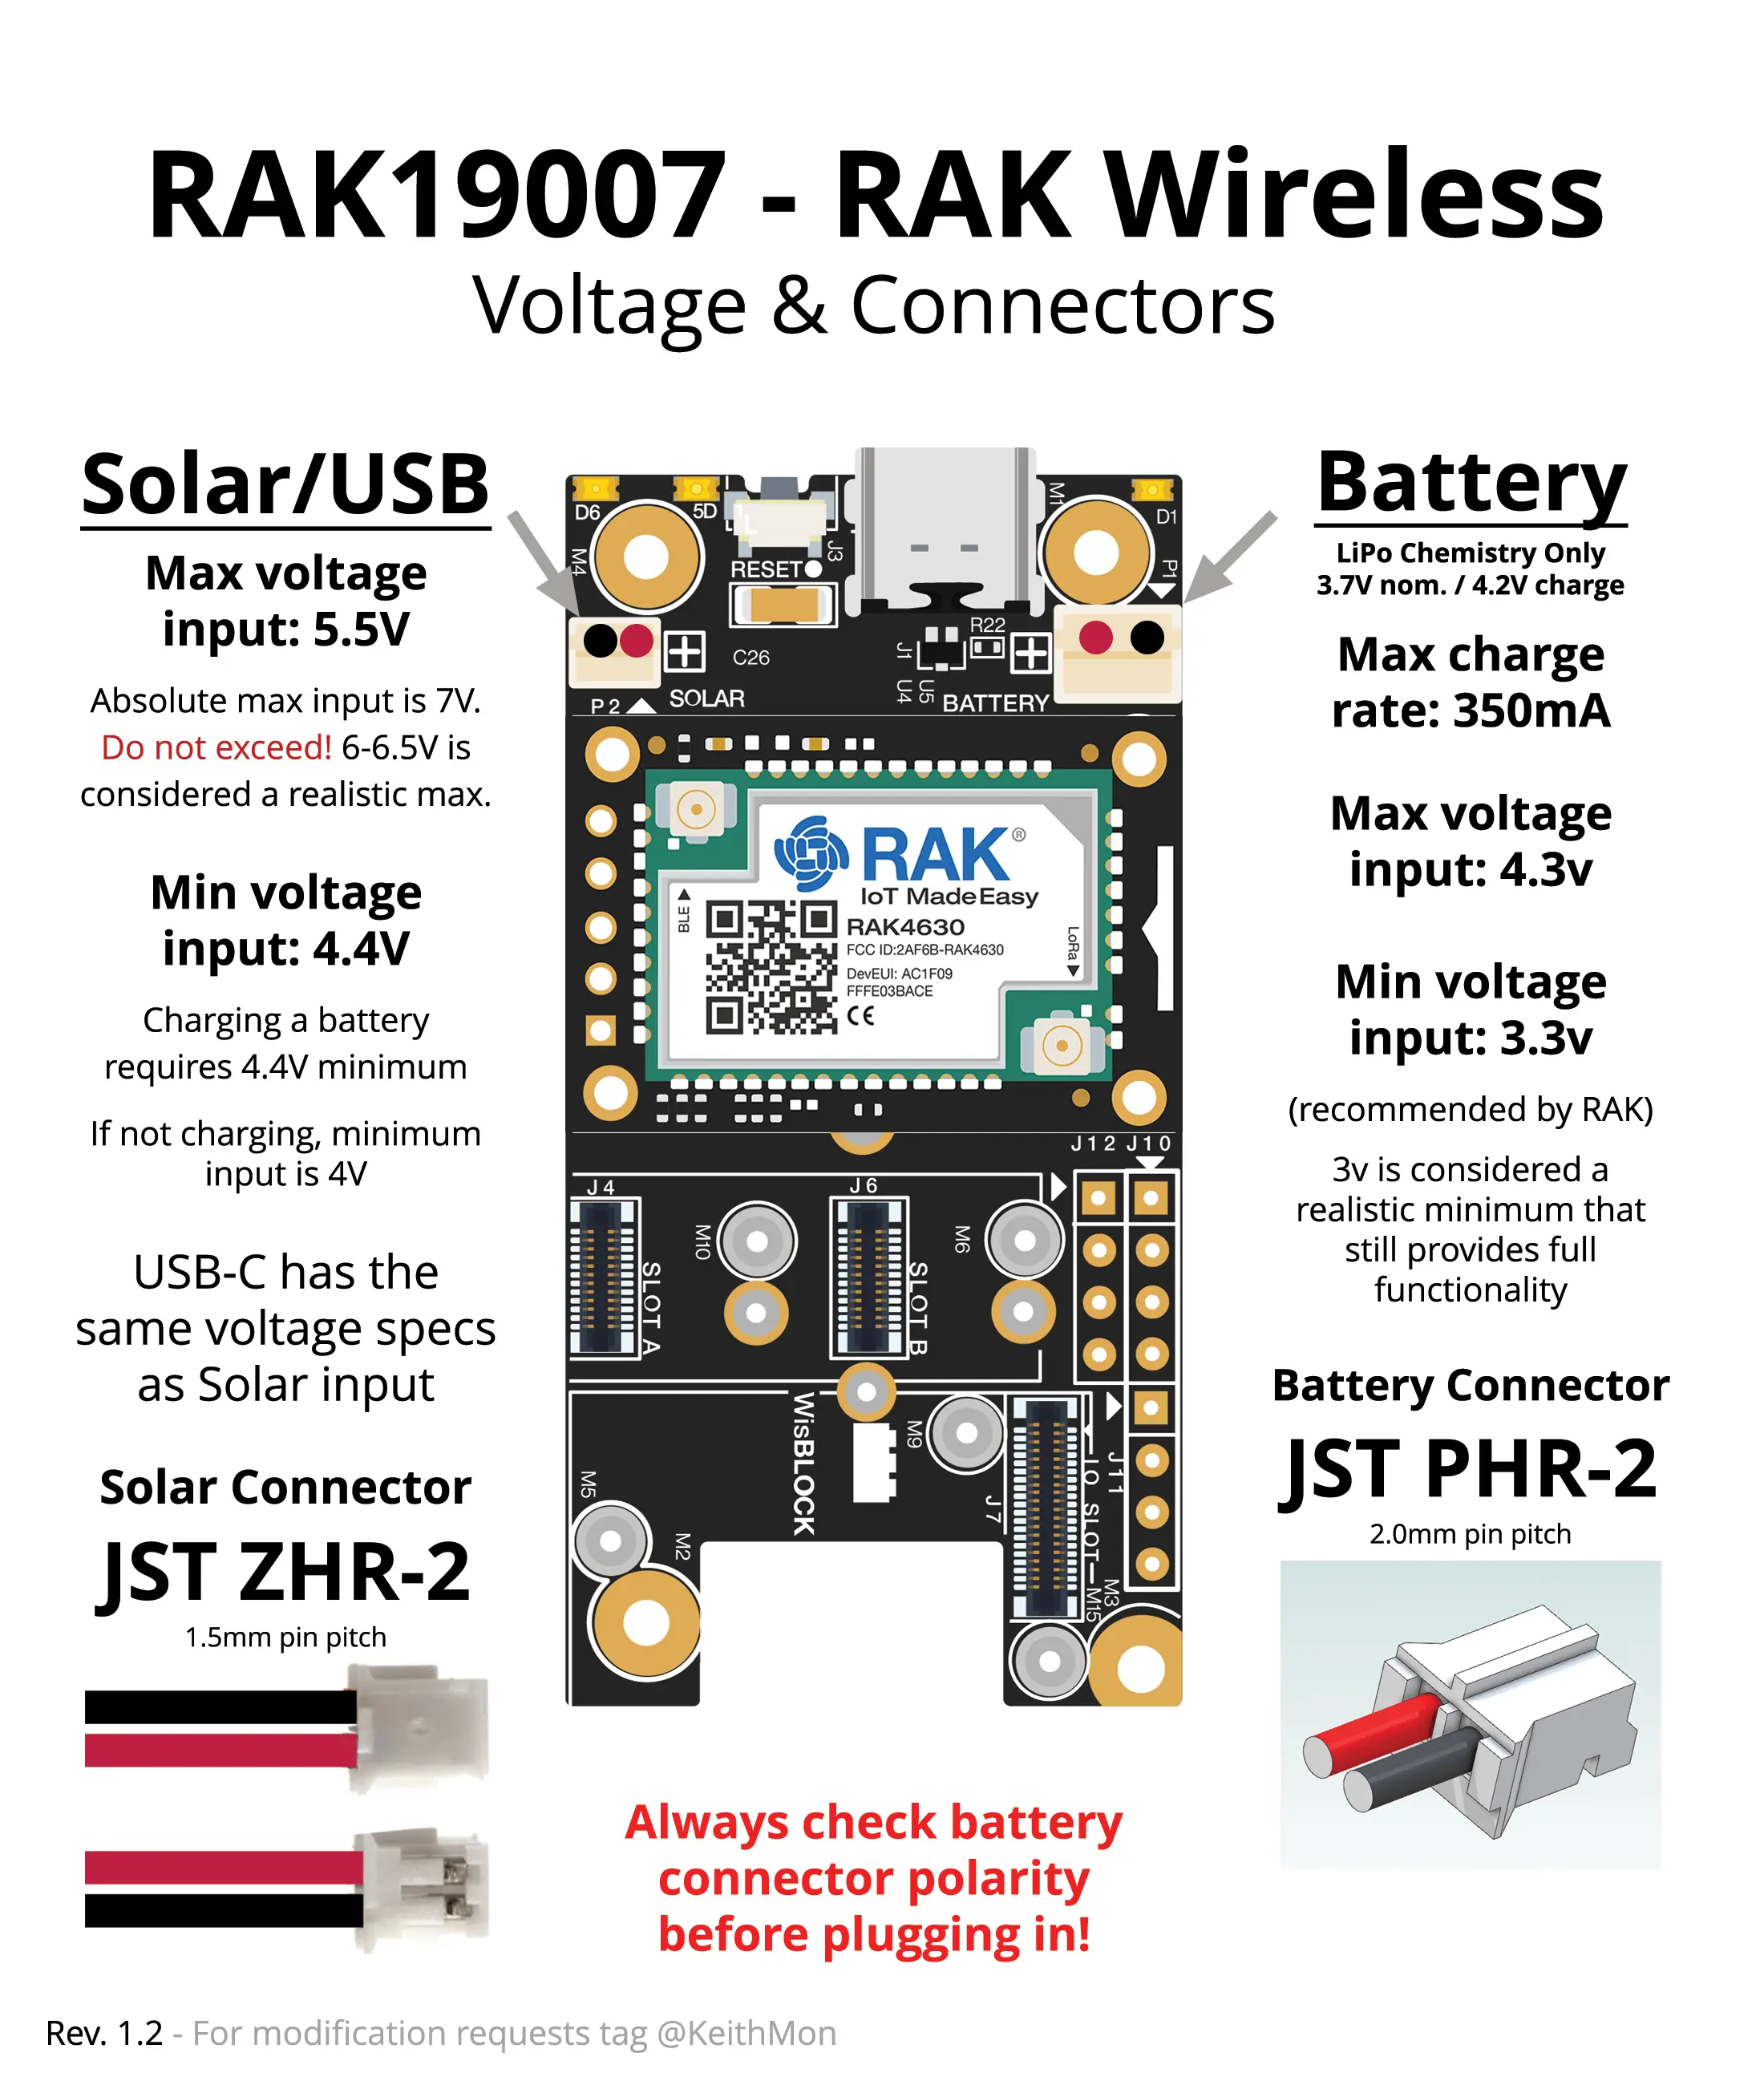 Image from the documentation
Here’s where things got interesting. The documentation warned that the solar input maxes out at 5.5V and anything over 7V could damage the board. My multimeter showed the panel outputting 7.4V in indirect light. Not good. I dug up a DC-DC step-down converter from an old project, took the Dremel to it again (removing the unnecessary USB outputs) and soldered the solar connector straight to the board. Stable 5V output. Problem solved.
 Inside the completed node showing all the components
 The completed node mounted on wood
Temperature Management Issues
My node was complete and ready for longer term testing. Everything worked perfectly until the first warm day. And by Adelaide standards, 27 degrees isn’t even that hot. The device’s internal temperature sensor was showing over 10 degrees warmer than ambient. That’s when I realised my mistake.


The temperature readouts were concerning: 41°C on the batteries and 55°C on the solar panel. This is very much not ideal. 18650 cells shouldn’t be charged above 45°C and you really want to keep them under 40°C for longevity. At 41°C I was right at the edge of what’s acceptable and on a properly hot Adelaide day this setup would definitely exceed safe charging temperatures. The risk isn’t just reduced battery life, charging lithium cells at high temperatures can actually be dangerous.
Mounting the solar panel directly to the case meant that large black surface was soaking up heat all day and radiating it straight back toward the batteries. For any future builds, I’ll definitely mount the panel externally. It makes way more sense for the Australian climate.
Meshtastic Python: Automating Your Node with BLE
With the hardware sorted, I wanted to start programmatically sending and receiving data. The Meshtastic app works fine, but I wanted to use Python and interface via BLE. This turned out to be trickier than expected.
After checking existing projects like the Home Assistant plugin, I noticed they all disabled the authentication mechanisms. There doesn’t seem to be any way to use the password when connecting from Python. If anyone knows how to do this properly, please let me know, because turning off authentication is really suboptimal.
Requirements
Once I disabled authentication, interfacing became straightforward. First step was getting the basic dependencies installed:
1
pip install meshtastic
Basic Auto Reply Example
Here’s a complete example that demonstrates all the fundamentals needed for automation. It authenticates to the node, subscribes to received events, checks if incoming packets are messages, matches them against a string and sends an automatic reply:
1
2
3
4
5
6
7
8
9
10
11
12
13
14
15
16
17
18
19
20
21
22
23
24
25
26
27
28
29
30
31
32
33
34
35
36
37
38
39
40
41
42
43
44
45
46
47
48
49
50
51
import asyncio
from bleak import BleakScanner
from meshtastic.ble_interface import BLEInterface
from pubsub import pub

TARGET_NAME = "Trav_2495"

def onReceive(packet, interface=None):
    """Auto-reply to messages containing 'testing123'"""
    try:
        decoded = packet.get("decoded")
        if not decoded:
            return

        portnum = decoded.get("portnum")

        # Check if it's a text message
        if portnum in ["TEXT_MESSAGE_APP", 1]:
            text = decoded.get("text", "")
            from_id = packet.get("fromId") or packet.get("from")

            if text and "testing123" in text.lower():
                print(f"Auto-reply triggered! Sending '456' to {from_id}")
                interface.sendText("456", destinationId=from_id)
    except Exception as e:
        print(f"Error: {e}")

async def main():
    print(f"Scanning for {TARGET_NAME}...")
    devices = await BleakScanner.discover(timeout=6)
    target = next((d for d in devices if d.name == TARGET_NAME), None)

    if not target:
        print(f"Device not found")
        return

    print(f"Connecting to {TARGET_NAME}...")
    pub.subscribe(onReceive, "meshtastic.receive")

    interface = BLEInterface(target.address)
    print("Connected! Listening for messages...")

    try:
        while True:
            await asyncio.sleep(1)
    except KeyboardInterrupt:
        print("\nShutting down...")
        interface.close()

if __name__ == "__main__":
    asyncio.run(main())
This example is very basic but has all the fundamentals you need for automation: connecting to the device, handling received packets, filtering for text messages, checking message content and sending replies. From here you can expand it to do whatever you need: trigger actions, log data, integrate with other systems, or build more complex chatbot logic.
Monitoring with Grafana Dashboards
If you’ve seen any of my other blogs, you’ll know I’m a big fan of Grafana. Being able to look at what’s happening with any of my projects over any time frame is extremely useful, so naturally I thought about adding a Grafana dashboard to my node. Turns out there’s other nerds out there who thought the same thing.
I found meshtastic-metrics-exporter on GitHub and this project is really cool. It has everything I was thinking about: full metrics on all devices in range and a complete node map with those satisfying connection lines between nodes. The best part? Someone in the Adelaide network was already hosting this for everyone to use.
 The main dashboard is really useful for information about the mesh network itself
The more useful dashboard for individual monitoring is the node dashboard. This shows detailed information about each specific node in the network. I use this to monitor the temperature from that temperature sensor I bought on a whim and keep an eye on the battery level. It lets me make sure the node is charging well and, more importantly, that it’s not overheating from that black solar panel.
 The node dashboard showing individual device metrics including temperature and battery levels
Eventually I plan on making my own dashboard to track packets received directly by my device and other node-specific performance metrics. This will help diagnose issues in my system while the other dashboards help with the wider network.
Still Searching for a Killer App
My exploration continues, but I still haven’t found a compelling use case that can’t be achieved with regular internet. The most practical application I’ve thought of would be monitoring a remote property without internet or cell service. You could set up a security system or general data collection while saving money on connectivity.
But for now, it’s just a really interesting technology to play with. And sometimes that’s enough.
Helpful Resources and Community Links
If you’re interested in building your own Meshtastic node or joining the Adelaide mesh network, here are some useful resources:
My Favourite Build Video - This YouTube tutorial was incredibly helpful when I was getting started. It covers the basics really well and helped me understand the hardware setup.
Adelaide Meshtastic Discord - Join the Adelaide mesh community! You can find links to the network map and Grafana dashboards here, plus there’s a whole heap of really helpful members who are always willing to answer questions and help troubleshoot issues.